
Bringing home a kitten is exciting—and the first week sets the tone for litter habits, confidence, and bonding. This new kitten guide walks you through the first seven days so you can settle your cat fast, avoid common mistakes, and build trust from day one. The kitten first week is all about safety, routine, and gentle introductions. Stock the right kitten essentials, then keep things calm and predictable.
Set Up Before Your Kitten Arrives
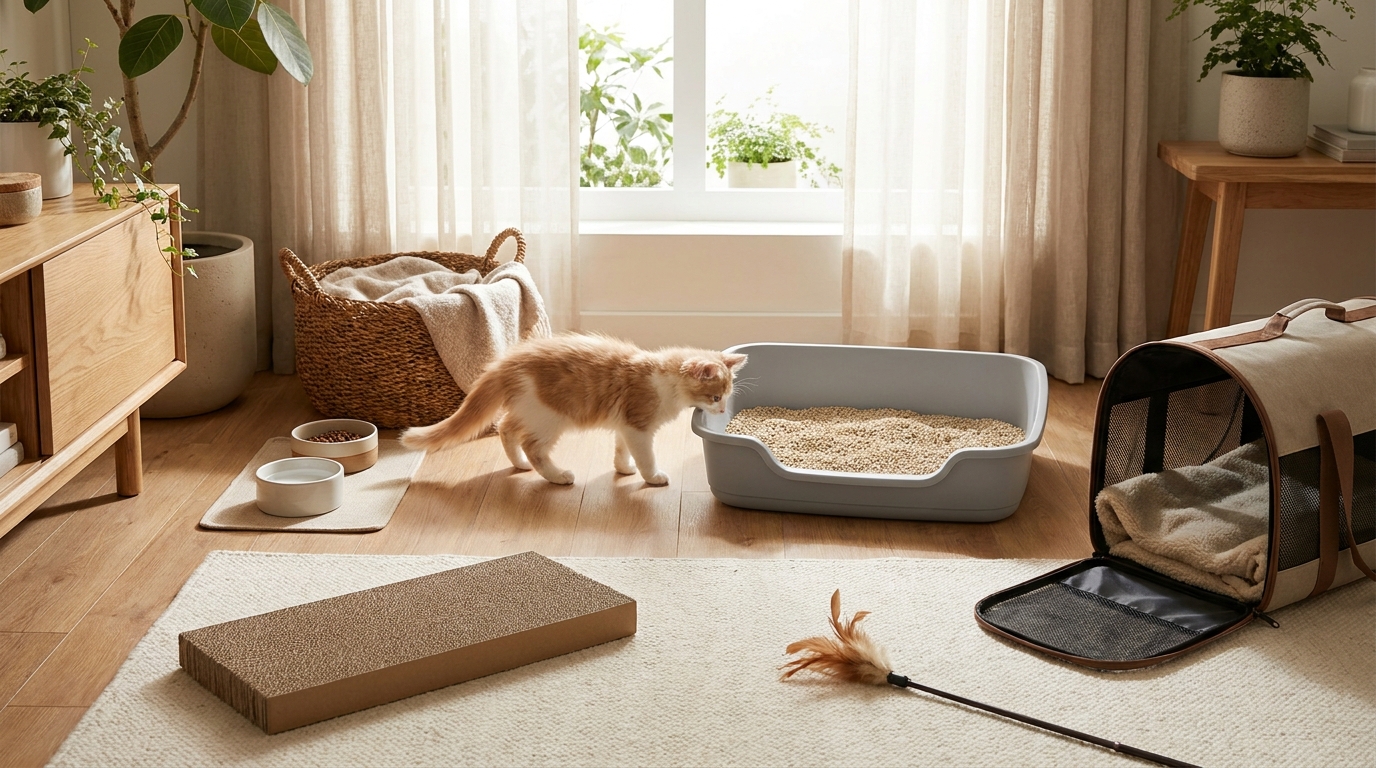
The easiest kitten first week starts before the carrier even comes through the door. Choose one quiet kitten safe room where your kitten can eat, sleep, and use the litter box without being overwhelmed. This helps reduce hiding, accidents, and stress-related tummy issues.
Here’s a quick new kitten checklist to have ready:
- Litter box + unscented litter: a low-sided box is easiest for tiny legs
- Food and water bowls: wide, shallow dishes can help with whisker comfort
- Kitten food: keep the same food your kitten is currently eating for at least a few days
- Cozy bed and blanket: include a soft hideout option
- Scratcher: place near the sleeping area (kittens often scratch after waking)
- Toys: a wand toy for play with you; a small kicker toy for solo time
- Carrier: leave it out so it becomes normal, not scary
Do a quick “kitten-proof” sweep: secure cords, remove small chewable items, close gaps behind appliances, and check houseplants for safety. If you have other pets, set up baby gates or a door plan for slow introductions.
Plant safety basics: If you keep plants, place them out of reach until you can confirm they’re safe for cats. When in doubt, skip greenery in kitten-access areas—chewing can cause anything from mild stomach upset to more serious problems depending on the plant.
Day 1: Homecoming and Safe Room
Bring your kitten straight to the starter room and open the carrier door without pulling them out. Let them decide when to emerge. Sit on the floor, talk softly, and keep visitors to a minimum.
Show the litter box first, then the water, then the food. Many kittens won’t eat immediately; stress can temporarily lower appetite. Offer a small meal, then give them space and try again later.
Carrier comfort tip: Keep the carrier in the safe room with the door propped open, a familiar-smelling blanket inside, and a few treats nearby. This turns the carrier into a hiding spot now and makes future trips (like the first vet visit) less stressful.
Keep the first day simple: one room, low noise, and short, calm interactions. If your kitten hides, that’s normal—avoid reaching under furniture. Instead, offer a treat near the hiding spot and let curiosity do the work.
Days 2–3: Feeding, Litter, Hydration, and Sleep Routine
By day two, you’re building predictability. Feed at consistent times and keep water refreshed. If you plan to change foods, do it gradually over several days to help prevent diarrhea.
Litter box training usually clicks fast if the box is easy to access and kept clean. Scoop at least once daily, and keep the box away from food and water. If you see accidents, don’t punish—clean thoroughly and place the kitten in the box after naps and meals to reinforce the routine.
Quick tip: If your kitten is hesitant to use a new litter box, add a small handful of the old litter on top to make the scent familiar.
How many litter boxes? A helpful rule of thumb is one box per cat, plus one extra. During the first week, keep at least one box in the safe room, and add another in a quiet, easy-to-reach spot as you expand your kitten’s access. Avoid placing boxes next to loud appliances or in tight corners where a kitten might feel trapped.
Hydration checks: Kittens can get dehydrated faster than adult cats. Offer fresh water daily and keep bowls clean. If you notice consistently dry, tacky gums, very low energy, or a kitten that isn’t peeing normally, call your vet promptly.
Expect lots of sleep. Kittens may snooze 16–20 hours a day in short bursts. Provide a warm, quiet sleeping spot and keep nighttime disruption low by scheduling a play session before your evening wind-down.
Plan short, gentle “practice sessions” for handling: touch paws, ears, and mouth briefly, then reward with a treat. This makes future nail trims and brushing much easier.
Days 4–5: Bonding, Play, and Handling
As confidence grows, your kitten will explore more and test boundaries. Use play to channel energy: two to three short sessions per day are often better than one long one. End play with a small meal or treat to support the hunt-eat-groom-sleep rhythm.
Choose toys that keep your hands safe. Wand toys are ideal for distance and let you control the intensity. Avoid encouraging biting of fingers or toes—what’s “cute” now becomes painful fast.
Start basic home manners early:
- Scratching: place scratchers in key areas and reward use
- Jumping/climbing: redirect to an approved cat tree or perch
- Solo time: practice short separations so your kitten learns you always return
If you have resident pets, do slow introductions: scent swapping (blankets), brief visual contact through a barrier, then short supervised meetings. Watch for stress signals like flattened ears, hissing, or swatting and slow down if needed.
Days 6–7: Health Checks, Parasite Prevention Basics, and Vet Timing
By the end of the first week, do a calm head-to-tail check during a relaxed moment. Look at eyes (clear, not crusty), nose (no heavy discharge), ears (no strong odor or dark debris), and coat (no bald patches or “pepper-like” dirt). Check the rear end for cleanliness and signs of loose stool.
When to call the vet: Contact a veterinarian promptly if your kitten has repeated vomiting or diarrhea, won’t eat for more than 24 hours, seems very lethargic, has labored breathing, looks dehydrated (dry gums, weakness), or you see worms/fleas or other parasites.
Parasites are a common early surprise for new pet parents. Even indoor kittens can be exposed through other pets, visitors, or hitchhiking pests. Good prevention supports your kitten’s comfort and helps protect your home.
Keep these basics in mind as part of your kitten essentials shopping list:
- Flea and tick prevention: choose a product labeled for kittens and follow label directions carefully
- Deworming support: many kittens need routine intestinal parasite control early on
- Environmental cleanup: wash bedding and vacuum to help reduce pests and eggs
Safety first (important): Many over-the-counter parasite products are not kitten-safe, and minimum age and weight requirements vary by product. Always ask your vet which option fits your kitten’s correct weight, minimum age, lifestyle, and the other pets in your household. Never use dog parasite products on cats.
About heartworm prevention: Your veterinarian may recommend heartworm prevention for kittens in some situations based on risk and household factors. Because needs vary, use vet guidance to choose a product that’s appropriate for your kitten’s age and weight and safe alongside any flea/tick or deworming plan.
First vet visit and general schedule: Plan a first checkup soon after bringing your kitten home so your vet can confirm overall health, check for parasites, and set up a basic plan for core vaccines and routine deworming appropriate for your kitten’s age and risk factors. Your clinic will tailor timing to your kitten’s history and will advise you on boosters and any testing that makes sense.
What to Buy From Us: First-Week Mini Checklist
If you’re stocking up for day one, here’s a quick buy list to keep your setup simple and kitten-friendly:
- Secure carrier for safe transport and calmer vet visits
- Kitten food (stick with the current diet at first, then transition slowly if needed)
- Litter and a low-sided litter box to support easy litter box training
- Scratchers to protect furniture and teach good habits early
- Flea and tick prevention selected for your kitten’s age/weight (vet-directed)
- Deworming support recommended by your veterinarian
Keeping a small “reorder list” (litter, food, and any vet-recommended preventives) helps you avoid last-minute runs during a busy first week.
Frequently Asked Questions
How do I know if my kitten is eating enough during the first week?
A small dip in appetite on day one can be normal, but your kitten should show steady interest in food within a day or two. Watch for normal energy between naps and consistent litter box use. If your kitten refuses multiple meals in a row or seems lethargic, contact your vet.
Should my kitten sleep with me right away?
It depends on safety and sleep quality for both of you. Many kittens do best starting in a safe room overnight with a bed, water, and litter box, then earning more freedom as they settle in. This also helps prevent nighttime accidents and risky climbing.
When can I let my kitten have access to the whole house?
Expand territory gradually once litter habits are consistent and your kitten is confidently eating, playing, and using scratchers. Open one new area at a time, then supervise exploration. If you notice hiding or accidents, scale back and try again after a day or two.
What should I bring to the first vet visit?
Bring any paperwork you received (adoption records, prior vaccine history if available), a stool sample if your clinic requests one, and a list of what your kitten is eating. Transport your kitten in a secure carrier with a towel or blanket for traction and comfort.
What are “must-buy” kitten essentials versus nice-to-haves?
Must-buys: litter box and litter, kitten food, bowls, a safe sleeping spot, and a secure carrier. Nice-to-haves: extra scratchers for multiple rooms, a cat tree/perch, puzzle feeders, grooming tools, and a variety of toys to learn your kitten’s preferences.
With a calm setup, a simple routine, and early planning for wellness care, most kittens settle quickly. If you’re unsure about parasite prevention choices or timing, your veterinarian can help you pick a safe option for your kitten’s age, weight, and household.